Blog 2 - Python pt. 2
Python: Learning Core Concepts
Our last blog was an introduction to Python and its many features, which have made it one of the most popular user-friendly programming languages. In this 2nd Python Blog, we will touch upon various core concepts that make full use of Python’s available features. We will review variables & data types, get input from users, and learn how to create functions. If one has experience with other programming languages such as C++ or Java, they will realize just how similar and simple Python syntax is. So without further ado, lets dive deep into our first core concept which is variables and data types!

The Main Data Types/Variables In Python
- Text Type: str
- Numeric Type: int, float, complex
- Sequence Types: list, tuple, range
- Boolean Type: bool
Data Types/Variables:
It is important to note that there are also mapping, set and binary types available in Python, but we will not cover those in this blog. Now that we are familiar with the various built-in data types available on Python, lets learn how to define them in code. Thankfully, Python’s user friendly interface allows users to create data types and variables by assigning them to a variable, or specifying a data type. For example, we will create the variable x and assign the string Hello World to it. We can do this in two ways in Python. The first way is just to create a variable x and assign the string: x = "Hello World". The second way, is to specify the data type you want to be associated with the variable x: x = str("Hello World") This syntax applies to all forms of data types in Python, with the following example defining an integer with the value of 20: x = int(20). Now that we’ve touched upon data types and variables, lets move onto how to ask users for input and store those values in variables.
Get User Input
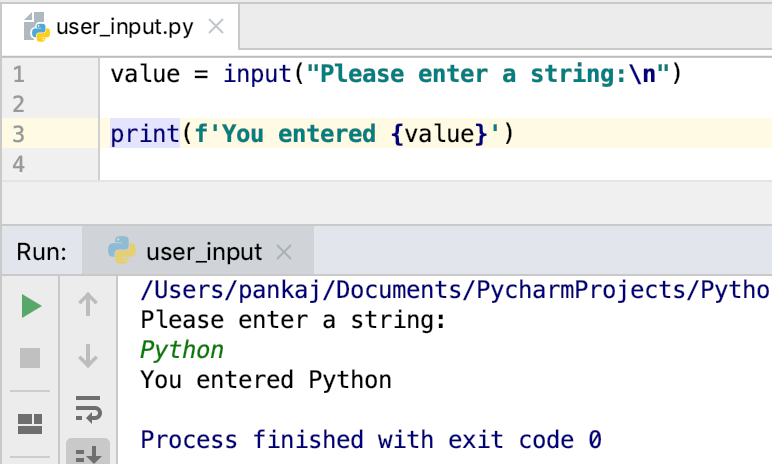
Taking input in Python is an easy task and can be achieved using a command name that is conveniently called input() By using the input() command, we can define a field-message that will be displayed to the user and will prompt them for input. We will then store that input in our own created variable. For this example, we will create a variable called name and ask the user to enter their first name. name = input("Please Enter Your Name: ") Notice that just in that one line of code, we were able to ask the user for input, provide a message to know what they should input, and store the inputted data into a variable. If we wanted to display the output back to the user to make sure they typed it correctly, we can use the print function with the name of the stored variable name inside of it. In our case, it would be: print(name). Although this is a very brief tutorial on getting user input, Python’s simple interface proves that you don’t need long lines of code just to ask a user to input data. The image below also shows an example of getting user input and printing it back, where the top portion of the image is the command line and the bottom portion is the screen the users would see and interact with.

Get User Input | Common Issues
Due to the large array of data types available in Python, most issues with getting input from users can arise because programmers may assume data for strings and integers get stored the same way. Just like how we specify data types when creating variables, we must always specify what data type we expect from a user input. For example, if you are creating a user input prompt to ask for age, you want to declare the input as a int or float, rather than a str. If input gets stored as a str, any calculations made with the string will result in an error. For this reason, its important to make sure data types are properly assigned so errors don’t arise later on in the program.
Functions In Python
A function is a block of code which runs when it is called, and in Python functions are created using the dev command. Following the dev command we can assign a name to our function and enclose it with parenthesis. For example, a function called calculator can be defined by: dev calculator(): Notice how we must add a colon after the enclosed parenthesis to define the function. Anything that is entered below that will be part of the function until a blank line separates it. Without going too in depth, we can expand the parenthesis in our function name to add data values to be passed in the function. For example, if you want to pass over the numbers 5 and 6 to calculator, we can define it as: dev calculator(5,6):, assuming the numbers have be declared as an int or float. Finally, the image below displays the basic template of how a function is created and called. def func1() is how we create the function and name it, and inside is a print command with text. Outside of the function, we run the function by calling it func1() The bottom portion of the image displays the result of the function after running.

Learn More Python Concepts
To learn more about Core Concepts In Python, visit Python to access some online tutorials. You can learn more about the fundamentals of Python, research specific documentation, and get in touch with users that may be learning the same topics as you. Websites such as W3Schools also have free Python tutorials that touch upon many of the concepts reviewed in the blog! This blog will be the last of its kind regarding Python for now, but future blogs may relate to Python and some of its concepts. Stay tuned for a new blog topic next week!